Flutter Habit vs. Lilac St. Lashes
I’ve been testing so many long-wearing DIY lash extensions over the past few years and I narrowed it down to my top two favorites (for now)- Lilac St. and Flutter Habit. I’ve reviewed them each on their own and I realized I’m not 100% sure which I prefer so I did a side-by-side comparison of each one. If you’ve been wondering which brand to try then this is the article for you!
*I have a discount code linked at the bottom.
Lilac St. & Flutter Habit lashes
Both Lilac St. and Flutter Habit are meant to be more long-wearing than your typical lash. It’s very similar to Lashify, if you’re familiar with them, but a fraction of the price. The lashes are placed under your lash line and glued up to the base of your lashes. They are very comfortable and can look and feel really natural! I prefer lashes like this to strip lashes that are glued on top of lashes because I find that they are actually easier to apply and they last for days! They also feel better on my eyes. I do love individual Ardell glue-ons for nights out but if I’m going on a trip and want easy- ready to go- makeup, or if I know I’m going to have a busy few days where I need to look glam FAST then these are ideal. I’ll break down the differences between the two brands below.
Lilac St. Lashes
Lilac st. currently has 7 styles and are $7 per set. Each set comes with 10 clusters- 5 per eye. Their lashes are made of Korean Silk lash fibers and are vegan & cruelty-free. The packaging is also fully recyclable.
They have two colors of brush on glue- clear or black ($10). *If you have lighter lashes you’ll probably prefer the black glue because it blends your lash color with the false lash. Lilac St. does have an applicator tool ($12) but you can use this or tweezers- both will work! They just launched their Crystal Coat ($12) which helps reduce stickiness and extend lash wear. They also just added the Conditioning Primer ($15) to their lineup- You use this after you’ve already cleaned your regular lashes- before you apply the glue ons. The primer helps to remove stubborn proteins that interfere with glue adhesion and maximize your wear time. It also nourishes and conditions your lashes with aloe, Centella, tea tree leaf, and witch hazel extracts.
Lilac St. has a Starter kit ($25) that comes with 2 sets of the original style lashes in 10mm and 12 mm- glue and an applicator.
Their sizes range from 8mm to 18! But most of their styles are 10mm to 16mm. You can select whichever length you want- I wear 12mm and 14mm the most.
I have an updated full review of Lilac St. HERE.
Let’s break down Lilac St.’s subscription:
It’s monthly or bi-monthly and there’s no fee if you want to skip or cancel- signing up is really easy too! You have to order a minimum of 4 lashes. If you order more you get money off each set. If you order 18 or more sets you get the lashes for $4 each!
Here’s the thing. They say you get “Up to” 40% off lashes BUT you have to order 18 sets to do that! That’s monthly or bi-monthly and if their lashes last 5 days a piece that’s 90 days of consistent lash wearing. So to see the full 40% discount you’d have to buy in bulk and either pause the subscription for 3 months and wear them daily. Otherwise, it’s not that great of a deal… I guess you could go halfsies with a friend or two? Still, I think this part of their subscription can use some work. Subscribers also get 25% off everything else they sell and Free shipping.
How to get the most mileage out of your Lilac St. lashes:
- Your lashes can last up to 5-7 days and I’ve had mine last a full week before!
- Avoid washing your lashes directly, especially with oil-based soaps or makeup remover. Carefully wash around the lash area with a washcloth and gently pat dry. Once your lashes are dry, fuse them with your applicator to seal the bond again.
- They say wearing a sleep mask will help prevent the rubbing of your lashes while you sleep. I tried that and found it uncomfortable so if you like doing this let me know in the comments.
FlutterHabit Lashes
Flutter Habit currently has 5 styles. Every box has 6 lashes and is $29.99 so that’s about $5 for each set. Each pair has 4 lash clusters per side with a total of 8 per set. So, the upfront cost is more but the lash set price is less- even without a subscription. Flutter habit lashes are faux mink and cruelty-free. The glue comes in only black and is $6.99 it comes in a squeeze tube. They also have a clear latex-free brush-on-glue option for the same price
They don’t have many other accessories- they have tweezers…. And they don’t offer a starter kit but really, you don’t really need one, tweezers work just fine!
Flutter Habit’s Subscription:
Their subscription isn’t the most straightforward to analyze. From what I can tell you save $5 per set with the subscription and they have an auto-ship service but that’s all I can tell as the benefit. You can choose 30, 45, or 60-day intervals, and switch back and forth as needed.
I signed up so I could see how it works but there were a lot of steps. You sign up PER lash style… I think? At least that’s what I experienced when I was trying to get info for this review. When I went to cancel it wanted me to email them. Honestly, both brands subscriptions can use some work but Lilac St. is easier to set up and pause/ cancel. I do like how they both don’t have a minimum time frame that you have to be a member (unlike Lashify).
Flutter Habit has the refer-a-friend bonus program! You can get money off of your order if your friends sign up with your link- this is a great feature!
How to get the most mileage out of your Flutter Habit Lashes:
- Avoid submerging your lashes in water. They recommend washing the top half and bottom half of your face separately and be careful when using makeup wipes or cotton pads around your eyes.
- If you’re like me and you love rubbing your eyes they say to at least be careful when doing it and don’t rub in the shower bc the glue can soften with steam.
That’s really all of the tips they had on how to make them last longer… pretty simple.
Comparing Lilac St. & Flutter Habit lashes side by side:
Lilac St.’s lash band is very thin and black. It doesn’t require any trimming and feels very comfortable on. You can use clear or black glue since the thin line will create that eyeliner look if you like to keep it natural.
Flutter Habit’s lash band looks similar to fishing line. It’s clear and does require you to pull the glue off from the packaging, and sometimes trim the sides.
Flutter Habit’s lash sizes range from 10mm to 14mm so they don’t have the longer options like Lilac St.
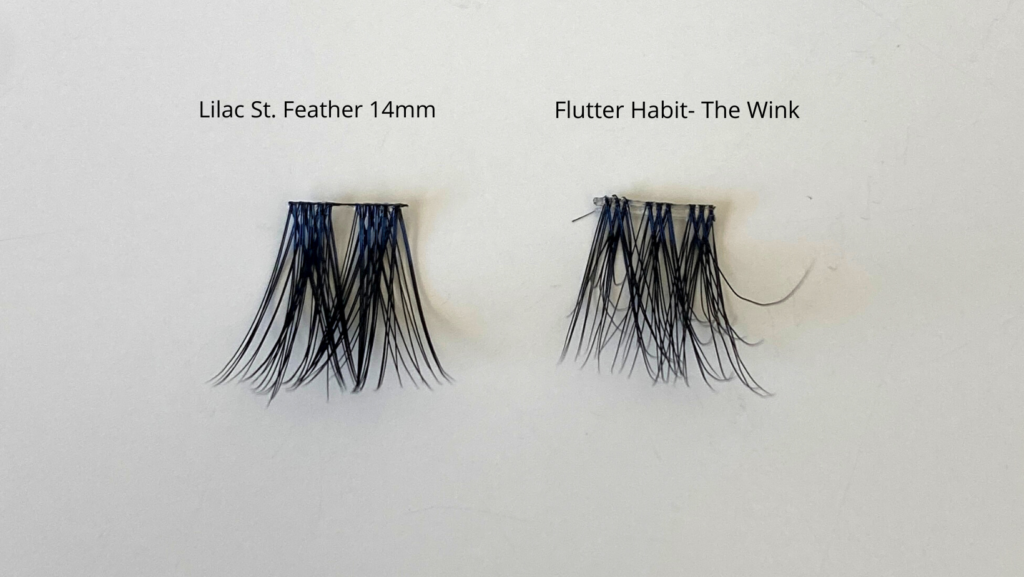
The Flutter Habit lashes look more fluffy and bold.
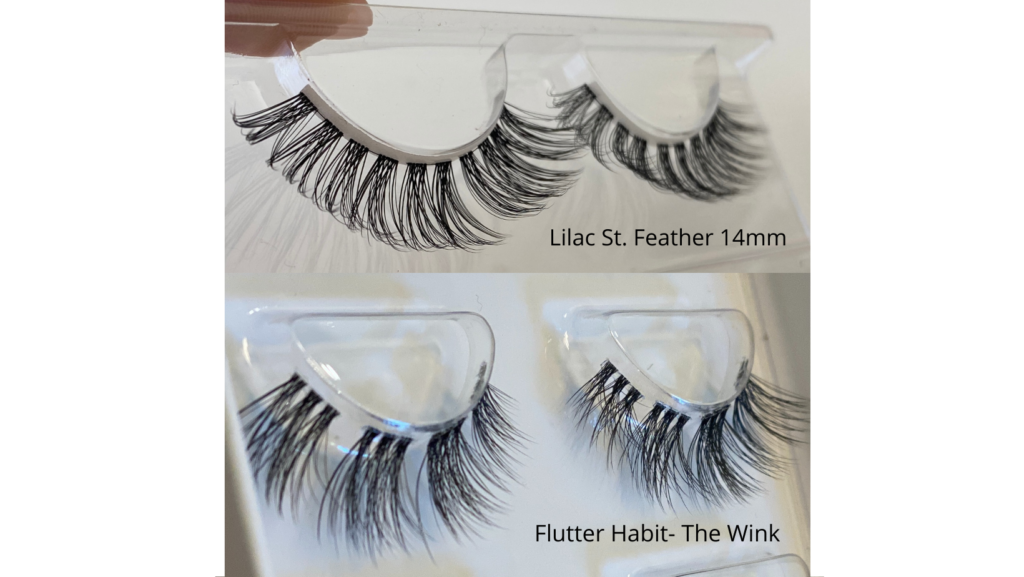
Seeing the brands side by side is kind of shocking! What a difference! Flutter habit lashes are fluffy and look more like real hair! They’re 3D! Lilac st. lashes are flatter and the hairs look synthetic.
Applying Flutter Habit vs. Lilac St. Lashes
The application methods from each brand is a little different mainly because of the glue packaging but if you’ve ever done this type of lash before the main idea is the same. If you want to watch a tutorial I go through all of the steps in the video above.
First, no matter what brand, make sure your lashes are clean with no makeup, or skincare on them.
If you have straight lashes curling them will make application much easier. This is my favorite lash curler! It fits my eye shape perfectly and doesn’t pinch. Also, the lash pads last forever and it gives you the best curl!
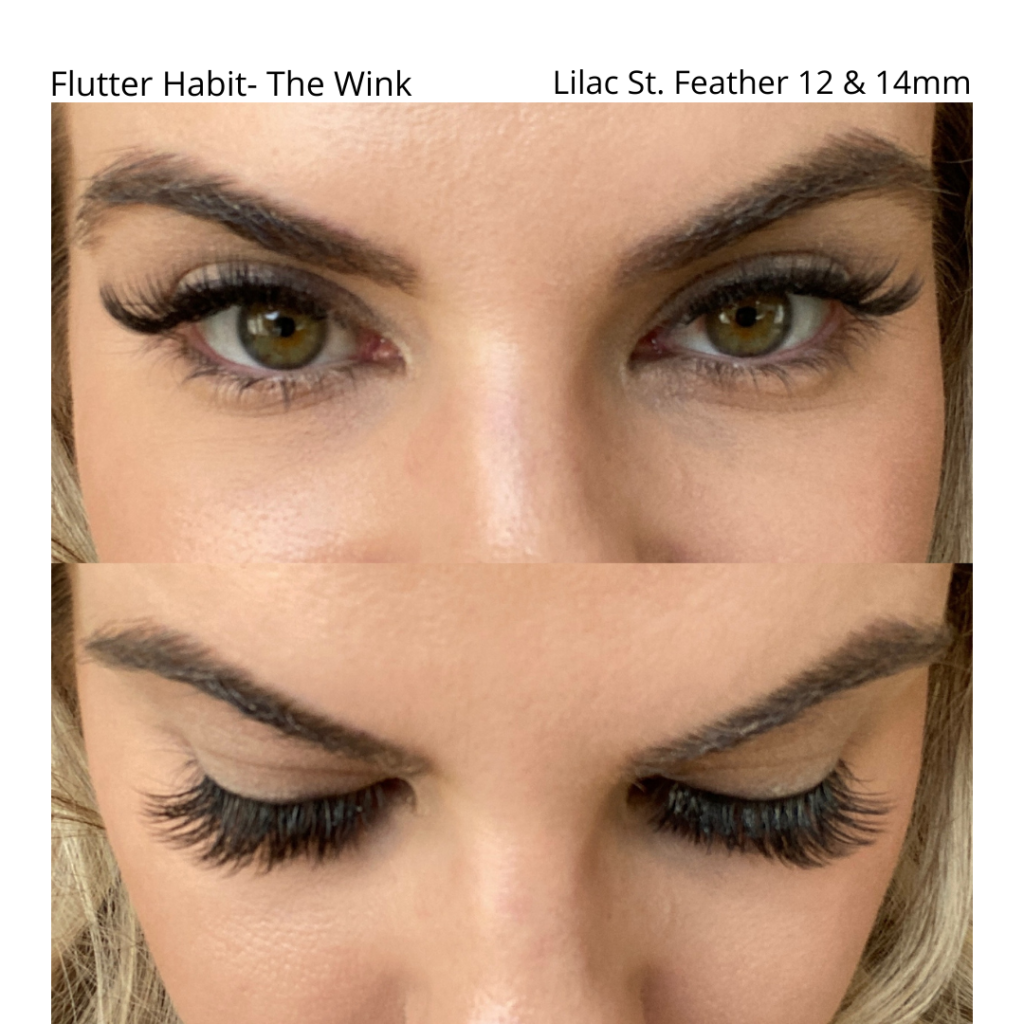
I applied Lilac St. Feather in size 12 and 14mm and Flutter Habit The Wink.
Let’s go through Lilac St. Lashes Instructions First:
- Apply to clean lashes- I like to do this on a recently washed face before I apply skincare. This would be a good time to use their new Conditioning Primer to remove any makeup residue or natural oils.
- They say to apply Lilac Lash glue to your lashes as you would mascara while focusing on the base of your lashes. I just put it on the base bc it can look really clumpy if I apply it to my full lash.
- Pulling their lashes off of the base can be challenging- flip the lash up then grab. It’s much easier.
- Apply glue to the top of the spines of the lash and give it about 15 seconds to set and get tacky.
- With your applicator or tweezers, grab just the tips of the lash segment so that most of the lash surface is exposed.
- Apply the segment to your natural lashes, lining up the base of the lash segment close to, but not touching, the start of your natural lashes. You want the segments to be about 1-2mm away from your waterline whether you choose to apply on the underside of your natural lashes or on top. I recommend not applying the segments all the way to your outer corners, especially if you’re a side-sleeper, to prevent them from getting crushed by your pillow. It also makes my eyes look droopy- that’s just how my eyes are shaped though.
- Hold the lash segment in place for about 3 seconds to allow it to attach to the glue. If your initial placement isn’t what you want, you can gently move the lash segment around to get to your ideal positioning.
- Continue adding more lashes while slightly overlapping the segments a little bit. This does a few things. First, it makes your lash line look very full! It also allows the lashes to hold onto each other for support.
- Once you’ve applied all of your segments, swipe a thin layer of Lilac Lash Crystal Coat to the inside of the applicator and fuse the segments and your lashes together to seal the bond. This will also help remove some of the tackiness of the glue. You can apply this to the bottom lashes too bc sometimes they get glue on them.
*If the lashes are sticking to your applicator when you are fusing them together, you may have gotten too much glue on the applicator. You can use a little alcohol to wipe the applicator off and try again.
*Make sure you are applying glue, not just on the spines of the segments, but also to the corners to ensure adhesion when overlapping.
*When the lashes have dried press them to your lashes with your thumb and pointer finger. This ensures the longest wear.
Flutter Habit Lashes Instructions
Flutter Habit’s instructions are a little less detailed but the idea is the same.
- Make sure your lashes are cleaned and curled
- Pull glue off the base of the lash where it was attached to the packaging
- Trim off any tails or stray hairs
- Squeeze glue into a bubble then wipe across the base of the lash on TOP of the lash segment
- Push glue up into the lash hairs
- Let dry for 20-30 seconds to become tacky
- Start applying
- Give glue 5 min to dry
- Use the back of your finger to push the lashes up into your lash.
Application of this lash style can take a little practice but you’ll get the hang of it after a few tries. I find that Lilac St. lashes are easier to apply. The lash sticks to your lash better because you applied glue to both so it’s attracted to your hairs and stays in place.
How to remove long-wearing lashes:
When you’re ready to remove the lashes each brand has a similar but different recommended technique. Fortunately, the removal is pretty easy for both of these. Unlike Moitie Lashes where I literally ripped out half of my lashes.
To remove Lilac st. you can use any makeup remover on a cotton round and hold it on your eye for 30 seconds. They should slide off.
To remove Flutter Habit they suggest using coconut oil but you could use makeup remover or a cleansing balm. Soften the adhesive by gently rubbing the remover or oil around on your eyes then pull them off from the base. If they’re not coming off just keep massaging the remover until it’s loose enough to remove.
Final Review:
The Lilac St. glue stayed tacky the rest of the day that I applied them but it was dry by the next day. Next time I’ll apply their sealer so it dries that same day.
As for the shape of the lash, I prefer Lilac St. I think they looked better with my eye shape- I think I need to try the Flutter Habit Shorties because the Wink was a little too long on the outer end.
When I washed my face I found that using a damp makeup eraser to remove eye makeup and face makeup worked well. Then I go in with my face wash and water. This works well because you don’t have to rub the eye area to remove makeup, it’s already off and you just need to lightly cleanse.
How long did the lashes last?
Two of the Flutter Habit lashes ended up falling off after 3 nights. The glue reminds me of Ardell temporary lash glue- it’s kind of gummy but you don’t really notice until you go to remove them. They’re VERY easy to remove- even without remover or oil.
The Lilac St. glue looked a little more caked-on as the days went on which is why I prefer the clear glue but you wouldn’t notice unless you were right up next to me. The glue works so well though! These lashes stay put! When the Flutter Habit lashes started coming off the Lilac st. lashes weren’t ready yet so I used my cleansing balm (Banila cleansing balm is the best) Rubbed a little and left it on for a few minutes and they came off easily. Then to remove the residual glue I use makeup remover on a cotton round. I didn’t pull out any of my lashes in the process on either eye!
Overall I actually prefer Lilac St.! Even though the lashes aren’t as fluffy looking in the box I think the glue is incredible and the lashes look great on! You can always mix and match so if you prefer the look of the Flutter Habit lashes try them with the Lilac St. Glue!
Have you tried either of these brands? What are your thoughts?
You can purchase Flutter Habit HERE.
You can purchase Lilac St. HERE (be sure to use the code LAUREN10 for 10% off!)
Have you heard of the new Lash System by Pro Lash? See my review HERE!
xx,
Lauren